Three dimensional roofing shingles represent a significant advancement in roofing technology, offering homeowners a blend of enhanced aesthetics and superior performance. This guide delves into the multifaceted world of 3D shingles, exploring their diverse types, installation methods, advantages, disadvantages, maintenance needs, environmental impact, and cost considerations. From understanding the manufacturing processes to mastering installation techniques, we aim to provide a complete resource for both professionals and homeowners considering this innovative roofing option.
We will examine various materials used in 3D shingle construction, comparing their durability, longevity, and cost-effectiveness. Furthermore, we will explore the unique aesthetic possibilities offered by 3D shingles, enabling homeowners to personalize their roofs to match their architectural style and individual preferences. The guide will also address practical aspects such as maintenance, repairs, and environmental considerations, ensuring a comprehensive understanding of this increasingly popular roofing choice.
Definition and Types of Three-Dimensional Roofing Shingles
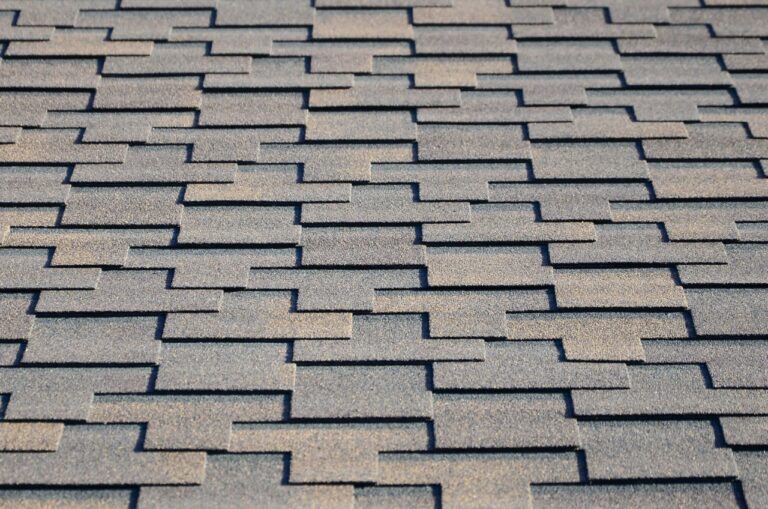
Three-dimensional roofing shingles represent a significant advancement in roofing aesthetics and performance. Unlike traditional flat shingles, 3D shingles offer a more textured, dimensional appearance, mimicking the look of natural materials like wood shakes or slate. This is achieved through their unique manufacturing processes and designs, resulting in a visually appealing and often more durable roofing system.
Manufacturing Process of Three-Dimensional Roofing Shingles
The manufacturing process for 3D shingles varies depending on the material, but generally involves several key steps. Asphalt shingles, for instance, begin with a base mat, typically fiberglass, onto which asphalt is applied. Then, a layer of mineral granules is added for weather protection and color. To create the three-dimensional effect, the shingles are molded into their textured shapes during the manufacturing process, often using specialized machinery and dies. Composite shingles often involve a similar process, but may incorporate different base materials and a wider range of colorants and protective coatings. Metal 3D shingles, on the other hand, typically begin with pre-fabricated metal sheets which are then cut, shaped, and finished to create the desired three-dimensional profile. This often involves advanced techniques like embossing or stamping.
Comparison of Three-Dimensional Shingle Materials
Asphalt, composite, and metal are the primary materials used in 3D shingle manufacturing, each offering unique advantages and disadvantages. Asphalt 3D shingles are generally the most affordable option, offering a good balance of cost and performance. However, they typically have a shorter lifespan compared to composite or metal options. Composite shingles, often made from a blend of fiberglass, polymers, and other materials, provide a more durable and longer-lasting solution, but at a higher initial cost. Metal 3D shingles, such as those made from aluminum or steel, are exceptionally durable and long-lasting, but are the most expensive and require specialized installation techniques.
Aesthetic Variations in Three-Dimensional Shingle Designs
The aesthetic possibilities with 3D shingles are vast. Manufacturers offer a wide array of colors, textures, and profiles to suit various architectural styles. Some designs mimic the look of natural slate, with deep shadows and irregular shapes. Others might replicate the appearance of wood shakes, providing a rustic charm. The dimensional aspect allows for the creation of more visually interesting rooflines, playing with light and shadow to add depth and character to a home’s exterior. Specific designs can create a dramatic, modern look or a more subtle, traditional feel. The variety of available styles allows homeowners to choose a shingle that perfectly complements their home’s architecture and personal aesthetic preferences.
Lifespan, Cost, and Maintenance of Three-Dimensional Shingles
The following table compares the lifespan, cost, and maintenance requirements of various 3D shingle types. It’s important to note that these are estimates, and actual values can vary based on specific product lines, installation quality, and environmental factors.
| Shingle Type | Lifespan (Years) | Cost (per square) | Maintenance Requirements |
|---|---|---|---|
| Asphalt 3D | 15-25 | $80-$150 | Minimal; occasional cleaning |
| Composite 3D | 30-50 | $150-$300 | Low; occasional inspection and cleaning |
| Metal 3D | 50+ | $300+ | Very low; occasional inspection |
Installation Methods and Techniques
Installing three-dimensional roofing shingles requires precision and attention to detail to ensure a long-lasting, weather-resistant roof. Proper installation involves several key steps, from preparing the underlayment to securing the shingles and ensuring adequate ventilation. Failure to follow these steps can lead to leaks, premature shingle failure, and costly repairs.
The installation process begins with a thorough assessment of the roof’s condition. Any damaged or deteriorated areas must be repaired before shingle installation commences. This may involve replacing damaged sheathing or addressing any underlying structural issues. The proper installation of underlayment is critical to protect the roof deck from moisture damage. Different types of underlayment offer varying degrees of protection, and the choice will depend on factors such as climate and roof design. A properly installed underlayment acts as a secondary barrier against water intrusion, enhancing the overall performance of the roofing system.
Necessary Tools and Safety Precautions
Proper tools and safety measures are paramount for a successful and safe installation. Improper tools can lead to damaged shingles and inefficient installation, while neglecting safety can result in serious injury.
Essential tools include a roofing nail gun, measuring tape, utility knife, chalk line, roofing hatchet, and a shingle starter strip. Safety equipment is equally critical and should include safety glasses, work gloves, and a safety harness, especially for steep-sloped roofs. Appropriate footwear with good traction is essential to prevent slips and falls. Always follow the manufacturer’s instructions for shingle installation and prioritize safety at every stage of the process. Working in pairs or teams allows for improved safety and efficiency.
Ventilation Best Practices
Adequate ventilation is crucial for maintaining a healthy roof and preventing the buildup of moisture. Moisture trapped within the roofing system can lead to mold growth, wood rot, and shortened shingle lifespan.
Proper ventilation involves creating an airflow path that allows for the escape of hot, moist air from the attic space. This is typically achieved through the use of ridge vents, soffit vents, and/or gable vents. The balance of intake and exhaust ventilation is key; insufficient intake can negate the effectiveness of exhaust vents. During 3D shingle installation, it’s essential to ensure that ventilation pathways remain unobstructed. Consult local building codes for minimum ventilation requirements and consider using a ventilation calculator to determine the appropriate amount of ventilation for the specific roof design.
Step-by-Step Installation Guide
The following steps provide a visual guide to installing 3D roofing shingles. Remember to always refer to the manufacturer’s specific instructions for your chosen shingles.
- Step 1: Roof Preparation: Thoroughly inspect and clean the roof deck, repairing any damaged areas. Install appropriate underlayment, overlapping sheets according to manufacturer’s instructions. Ensure proper ventilation pathways are established.
- Step 2: Starter Course: Install a starter strip along the eaves, providing a straight and even base for the remaining shingles. This ensures a uniform and aesthetically pleasing finished product.
- Step 3: Shingle Installation: Begin installing the first row of shingles, aligning them with the starter strip. Secure the shingles with roofing nails, following the manufacturer’s recommendations for nail placement and penetration depth. Maintain consistent spacing between shingles.
- Step 4: Overlapping and Alignment: Subsequent rows of shingles should overlap the previous row, ensuring complete coverage and weather protection. Maintain consistent alignment to create a neat and uniform appearance. Use a chalk line to aid in keeping straight lines.
- Step 5: Ridge and Hip Installation: Install ridge and hip caps according to the manufacturer’s instructions. These specialized shingles are designed to protect the vulnerable edges of the roof. Pay close attention to proper alignment and sealing.
- Step 6: Final Inspection: Once the installation is complete, conduct a thorough inspection to identify and address any issues, such as loose shingles or gaps in coverage. Ensure all nails are properly secured and that the roof is watertight.
Advantages and Disadvantages of 3D Shingles
Three-dimensional roofing shingles offer a distinct aesthetic appeal and, in some cases, enhanced performance compared to traditional flat shingles. However, their unique design also introduces certain challenges and considerations. A thorough understanding of both the benefits and drawbacks is crucial for homeowners and contractors alike when making roofing material decisions.
Durability and Weather Resistance of 3D Shingles
The multi-layered and textured design of 3D shingles contributes significantly to their durability and weather resistance. The overlapping layers create a more robust barrier against wind, rain, and snow, reducing the likelihood of water penetration and damage. The textured surface also helps to shed water more effectively, minimizing the risk of ice dams in colder climates. Many 3D shingles incorporate advanced polymer materials that enhance their resistance to UV degradation, extending their lifespan compared to traditional asphalt shingles. For instance, a properly installed 3D shingle roof in a region with frequent hailstorms may show less damage than a flat shingle roof due to the added protection offered by the dimensional layering.
Cost and Installation Complexity of 3D Shingles
While offering superior protection, 3D shingles typically come with a higher initial cost compared to standard flat shingles. This increased expense stems from the more complex manufacturing process and the greater amount of material used. Installation can also be more labor-intensive and time-consuming, requiring specialized skills and techniques to ensure proper alignment and sealing of the overlapping layers. The higher cost of labor and materials directly translates to a higher overall project cost. A typical 2000 sq ft roof might see a cost increase of 20-30% using 3D shingles versus standard asphalt shingles, depending on location and contractor.
Performance Comparison in Various Climates
The performance of 3D shingles relative to flat shingles varies depending on the specific climate. In areas with heavy snowfall, the enhanced water shedding and wind resistance of 3D shingles can be particularly advantageous, reducing the risk of ice dam formation and shingle blow-off. In regions with intense sun exposure, the UV resistance of many 3D shingle types can extend their lifespan significantly. However, in areas prone to extreme temperature fluctuations, the expansion and contraction of the shingle material might need to be carefully considered, potentially requiring specialized underlayment or installation techniques.
Summary of Pros and Cons of 3D Roofing Shingles
| Pros | Cons |
|---|---|
| Enhanced Durability | Higher Initial Cost |
| Improved Weather Resistance | More Complex Installation |
| Superior Wind Resistance | Potentially Longer Installation Time |
| Enhanced Aesthetic Appeal | Specialized Contractor Skills May Be Required |
Maintenance and Repair of 3D Shingles
Proper maintenance is crucial for extending the lifespan of your 3D roofing shingles and preventing costly repairs. Regular inspections and timely attention to minor issues can significantly reduce the risk of major problems down the line. This section details recommended maintenance procedures, common problems, and the impact of weather on these specialized shingles.
Regular Maintenance Procedures
Regular maintenance involves several key steps designed to identify and address potential problems before they escalate. These procedures should be performed at least twice a year, in spring and autumn, to account for seasonal changes and potential damage from extreme weather. More frequent inspections might be necessary in areas prone to severe weather events.
- Visual Inspection: Carefully examine the entire roof surface for missing, damaged, or loose shingles. Look for signs of granule loss, curling, or buckling. Pay close attention to areas prone to wind damage, such as ridges and valleys.
- Gutter and Downspout Check: Ensure gutters and downspouts are clear of debris to prevent water buildup and potential damage to the roofing system. Clogged gutters can lead to ice dams in winter and water damage to the underlying structure.
- Flashing Inspection: Check the flashing around chimneys, vents, and skylights for any signs of damage or deterioration. Proper flashing is critical for preventing water leakage.
- Moss and Algae Removal: Regularly remove moss and algae growth to prevent staining and damage to the shingles. A gentle cleaning with a soft brush and a solution of water and mild detergent is usually sufficient. Avoid using harsh chemicals.
- Tree Limb Trimming: Keep tree branches trimmed away from the roof to prevent damage from falling limbs and to improve airflow, reducing moisture accumulation.
Common Problems and Repair Methods
Several issues can affect 3D shingles over time. Addressing these promptly minimizes further damage and extends the roof’s lifespan.
- Missing or Damaged Shingles: Replace any missing or damaged shingles immediately with matching replacements. Ensure proper nailing and sealing to prevent water infiltration.
- Granule Loss: While some granule loss is normal over time, excessive loss indicates potential problems. If significant granule loss is observed, it might be necessary to replace affected shingles. This is often more noticeable on older roofs exposed to harsh weather.
- Curling or Buckling: Curling or buckling shingles usually indicate moisture problems or improper installation. These shingles should be replaced to prevent further damage and potential leaks. Addressing underlying moisture issues, such as poor ventilation, is also crucial.
- Cracked or Broken Shingles: Cracked or broken shingles should be replaced promptly. This is especially important in areas prone to heavy snowfall or hail, where impacts can cause significant damage.
Weather Conditions and Longevity
Different weather conditions significantly impact the longevity of 3D shingles. Extreme temperatures, heavy rainfall, strong winds, and hail can all contribute to premature wear and tear.
For example, prolonged exposure to intense sunlight can cause the shingles to fade and become brittle, increasing the risk of cracking and granule loss. Heavy snowfall can put extra stress on the roof structure, potentially leading to damage or shingle displacement. Similarly, strong winds can lift or tear shingles, while hail can cause significant impact damage, resulting in cracks and punctures.
Coastal areas with high salt content in the air can also accelerate shingle deterioration. The salt can corrode the shingle materials, leading to premature failure. Regular maintenance and the use of high-quality, weather-resistant shingles are particularly important in such environments.
Homeowner Roof Inspection Checklist
A regular inspection is vital for early problem detection. This checklist helps homeowners systematically assess their 3D shingle roof.
- Inspect the entire roof surface for missing, damaged, or loose shingles.
- Check for signs of granule loss, curling, or buckling.
- Examine the flashing around chimneys, vents, and skylights for damage.
- Ensure gutters and downspouts are clean and free of debris.
- Look for any signs of moss or algae growth.
- Check for any signs of water damage or staining on the roof or interior ceilings.
- Assess the condition of the roof valleys and ridges.
- Inspect the attic for signs of moisture or leaks.
Environmental Impact and Sustainability
The environmental footprint of 3D roofing shingles is a multifaceted issue encompassing manufacturing processes, material sourcing, energy performance, and end-of-life management. Understanding this impact is crucial for responsible building practices and the pursuit of sustainable roofing solutions. This section examines the environmental aspects of 3D shingles, comparing them to traditional materials and highlighting eco-friendly alternatives.
The manufacturing of 3D shingles, like other roofing materials, consumes energy and resources. The energy intensity varies depending on the specific materials used (e.g., asphalt, composite materials, recycled content) and the manufacturing processes employed. Transportation of raw materials and finished products also contributes to greenhouse gas emissions. Disposal of old 3D shingles, often ending up in landfills, presents another environmental concern. The volume of waste generated and the potential for leaching of harmful substances into the environment need careful consideration.
Energy Efficiency of Roofs with 3D Shingles
Roofs covered with 3D shingles can contribute to a building’s overall energy efficiency, although the extent depends on several factors. The color and reflectivity (albedo) of the shingles significantly influence the amount of solar radiation absorbed and re-radiated. Darker-colored shingles absorb more heat, potentially increasing cooling loads in summer, while lighter-colored shingles reflect more solar radiation, reducing cooling needs. Proper ventilation within the roof structure is also essential for maintaining optimal temperatures and preventing heat buildup. Comparing the energy performance of a roof with 3D shingles to one with traditional asphalt shingles requires considering factors such as the shingle’s color, the building’s climate, and the presence of adequate insulation. For instance, a light-colored 3D composite shingle in a hot, sunny climate could offer superior energy efficiency compared to a dark-colored asphalt shingle in the same location, potentially leading to lower energy consumption for cooling.
Eco-Friendly Options in 3D Roofing Shingles
Several manufacturers are developing and marketing eco-friendly 3D roofing shingles. These options often incorporate recycled materials, such as recycled plastics or rubber, in their composition, reducing the reliance on virgin resources. Some shingles are also designed to be more durable and longer-lasting, extending their lifespan and reducing the frequency of replacements. The use of sustainably harvested wood in composite shingles is another aspect of eco-conscious manufacturing. The availability and cost of these eco-friendly options vary by region and manufacturer. Choosing shingles with high recycled content and a longer lifespan is a step towards more sustainable roofing. For example, a 3D shingle made from 50% recycled plastic and designed for a 50-year lifespan would have a significantly lower environmental impact compared to a traditional asphalt shingle needing replacement every 15-20 years.
Recyclability and Sustainability Aspects of 3D Shingles
The recyclability of 3D shingles is currently limited compared to some other building materials. Many asphalt-based shingles are not easily recycled, often ending up in landfills. However, some manufacturers are exploring options for recycling or repurposing shingle components. Efforts are underway to develop processes for recovering and reusing materials like asphalt, fiberglass, and other components found in 3D shingles. The development of robust recycling infrastructure and industry standards for shingle recycling are crucial steps towards improving the sustainability of 3D shingles. Increased use of recycled materials in manufacturing and the design of shingles for easier disassembly and recycling are key to achieving a more circular economy for this roofing material. While complete recyclability isn’t yet widespread, ongoing research and development aim to improve this aspect of 3D shingle sustainability.
Cost Considerations and Budgeting
Choosing 3D roofing shingles involves a significant financial commitment. Understanding the associated costs and developing a comprehensive budget is crucial for a successful project. This section will break down the expenses involved, explore factors affecting the total cost, compare 3D shingles to other roofing options, and provide a framework for budgeting your 3D shingle roof installation.
The cost of a 3D shingle roof installation varies considerably depending on several factors. While a precise figure is impossible without a detailed assessment of your specific project, understanding the contributing elements allows for better financial planning.
Cost Breakdown of 3D Shingle Roofing
The overall cost comprises material costs, labor costs, and any additional expenses. Material costs include the shingles themselves, underlayment, flashing, nails, and other necessary components. The quantity needed depends directly on the roof’s size and complexity. Labor costs are determined by the roofing contractor’s hourly rate or project fee and the complexity of the installation, which can be influenced by roof pitch, size, and accessibility. Additional expenses might include permits, waste removal, and potential repairs to the existing roof structure before installation. A reputable contractor will provide a detailed breakdown of these costs in their quote.
Factors Influencing the Overall Cost
Several factors significantly impact the final cost of your 3D shingle roof. The size and complexity of your roof are primary determinants. Larger, more complex roofs naturally require more materials and labor, increasing the overall cost. The steepness of the roof pitch also affects labor costs; steeper roofs are more challenging and time-consuming to work on. The geographic location plays a role; labor and material costs vary regionally. The type of 3D shingle chosen also influences cost; premium, high-end shingles command a higher price than more basic options. Finally, the condition of your existing roof impacts the total cost; extensive repairs or replacement of underlying structures can add substantial expense. For example, a large, complex roof in a high-cost area with significant pre-existing damage could easily cost several times more than a smaller, simpler roof in a lower-cost area requiring minimal pre-work.
Long-Term Cost-Effectiveness of 3D Shingles
While the initial investment in 3D shingles is higher than some alternatives like asphalt shingles, the long-term cost-effectiveness can be compelling. 3D shingles offer superior durability and longevity, potentially lasting twice as long as standard asphalt shingles. This translates to reduced long-term replacement costs and lower maintenance needs. The increased energy efficiency due to better insulation can also lead to lower energy bills over the lifespan of the roof. A life-cycle cost analysis, comparing the initial investment, maintenance costs, and replacement costs over several decades, often reveals 3D shingles to be a financially sound choice in the long run, particularly when considering the potential for increased home value. For instance, a 30-year lifespan for 3D shingles versus a 15-year lifespan for asphalt shingles can result in significant cost savings over the course of 30 years, even with the higher upfront cost.
Creating a Budget for a 3D Shingle Roofing Project
Careful budgeting is essential to avoid cost overruns. A detailed breakdown of anticipated expenses is crucial.
- Material Costs: This includes the shingles, underlayment, flashing, nails, and any other necessary roofing materials. Obtain multiple quotes from different suppliers to compare prices.
- Labor Costs: Obtain at least three detailed quotes from reputable roofing contractors. Ensure the quotes clearly specify all labor charges and any potential additional fees.
- Permits and Inspections: Factor in the cost of obtaining necessary building permits and paying for inspections.
- Waste Removal: Include the cost of disposing of old roofing materials responsibly.
- Contingency Fund: Always include a contingency fund (typically 10-15% of the total estimated cost) to cover unforeseen expenses or price increases.
- Pre-existing Roof Repairs: If repairs to the existing roof structure are needed before installation, factor in those costs.
Last Point
Ultimately, the decision to install three-dimensional roofing shingles involves weighing several factors, including aesthetic appeal, budget, and long-term maintenance. This guide has provided a thorough examination of these considerations, equipping readers with the knowledge necessary to make an informed choice. By understanding the diverse types of 3D shingles available, their installation processes, potential benefits and drawbacks, and environmental implications, homeowners and contractors can confidently navigate the complexities of this innovative roofing solution and select the best option to meet their specific needs and enhance their property’s value and curb appeal.