Installing a metal roof over asphalt shingles presents a unique set of challenges and rewards. This process, often chosen for its durability and longevity, requires careful planning and execution. From initial roof assessment and shingle removal (if necessary) to the precise installation of metal panels and flashing, each step demands attention to detail to ensure a long-lasting, leak-proof roof. This guide navigates you through every stage, providing practical advice and addressing common concerns along the way.
Successfully completing this project hinges on a thorough understanding of your existing roof’s condition, proper material selection, and skillful execution of each installation phase. We will cover everything from safety precautions and tool selection to the intricacies of flashing and sealant application, equipping you with the knowledge to confidently tackle this significant home improvement undertaking. Whether you’re a seasoned DIY enthusiast or a homeowner embarking on your first major roofing project, this comprehensive guide will serve as your reliable companion.
Preliminary Assessment
Installing a metal roof over existing asphalt shingles requires a meticulous preliminary assessment to ensure a safe and successful project. This involves a thorough inspection of the existing roof, evaluation of its condition, and identification of any potential issues that could compromise the longevity or structural integrity of the new metal roof. Proper planning at this stage significantly reduces the risk of unforeseen complications and cost overruns during the installation process.
Roof Inspection Procedures
A comprehensive roof inspection is crucial before commencing the metal roof installation. This involves a visual examination of the entire roof surface, checking for damaged or missing shingles, signs of water damage, rotted wood, loose flashing, or any other structural defects. Particular attention should be paid to areas prone to leaks, such as valleys, chimneys, and vents. Inspecting the attic space for signs of moisture or pest infestation is also essential. This provides a complete understanding of the underlying roof structure’s condition, informing the suitability of an overlay. For example, significant rot or structural damage might necessitate complete roof replacement rather than an overlay.
Required Tools and Safety Equipment
Appropriate tools and safety equipment are paramount for a safe and efficient roof inspection. This includes a sturdy ladder that extends at least three feet above the roofline, work gloves, safety glasses, a hard hat, a roofing hatchet or pry bar for inspecting shingle condition, and a moisture meter to check for water damage in the underlying decking. A camera can also be useful for documenting the condition of the roof for reference. Using a harness and safety line is highly recommended, especially for steeper roofs, to prevent falls. Remember, safety is paramount, and neglecting proper safety measures can lead to serious injury.
Determining Roof Suitability for Overlaying
The existing asphalt shingle roof’s condition dictates its suitability for an overlay. A roof with extensive damage, significant deterioration, or structural problems is not a suitable candidate for an overlay. The existing roof must be structurally sound and capable of supporting the additional weight of the metal roofing system. A good rule of thumb is that the existing shingles should be in relatively good condition, with no more than 20% showing significant damage. If the underlying decking is compromised, it needs repair or replacement before the metal roof installation can proceed. For instance, if more than 20% of the shingles are curled, cracked, or missing, it may be more cost-effective to remove the old shingles completely before installing the metal roof. An assessment of the existing roof’s slope is also vital. Too shallow a slope may not be appropriate for a metal roof overlay.
Pre-Installation Checklist
Before initiating the metal roof installation, a comprehensive checklist must be reviewed. This checklist should include confirmation that all necessary permits have been obtained, that the existing roof is structurally sound and suitable for an overlay, that all required materials are on hand, that the weather forecast is favorable, and that the necessary safety precautions are in place. Verifying that the metal roofing panels are correctly ordered to match the roof dimensions and the type of underlayment needed also falls under this crucial step. This ensures a smooth and efficient installation process, minimizing delays and potential issues during the project.
Removal of Existing Asphalt Shingles (if necessary)
Removing existing asphalt shingles before installing a metal roof is often necessary to ensure a proper and long-lasting installation. This process requires careful attention to safety and proper disposal methods. Improper removal can lead to damage to the underlying roof deck and even injury to the worker.
Safe Shingle Removal Procedures
Safe and efficient shingle removal involves a systematic approach. Begin by inspecting the roof for any loose or damaged shingles, which should be removed first to prevent further damage or accidents during the main removal process. Always wear appropriate personal protective equipment (PPE), including a hard hat, safety glasses, work gloves, and sturdy work boots with good ankle support. Use a pry bar or shingle remover to carefully lift and remove shingles, starting from the bottom edge of the roof and working your way up. Dispose of shingles in a safe and controlled manner as you progress. Avoid sudden movements and maintain three points of contact on the roof at all times. For steep-sloped roofs, consider using a safety harness attached to a secure anchor point. Work with a partner whenever possible to assist with shingle removal and ensure safety.
Responsible Disposal of Removed Shingles
Proper disposal of asphalt shingles is crucial for environmental responsibility. Most municipalities have regulations regarding the disposal of construction waste. Check with your local waste management authority to determine the proper disposal methods and any associated fees. Many areas offer curbside pickup for large quantities of shingles, while others may require transportation to designated disposal sites. Consider recycling options; some companies specialize in recycling asphalt shingles into other construction materials. Avoid dumping shingles illegally, as this can lead to environmental damage and hefty fines. Always bag or containerize smaller pieces to prevent scattering and maintain a clean worksite.
Identifying and Addressing Underlying Roof Damage
Once the shingles are removed, carefully inspect the underlying roof deck for any signs of damage. Look for rotted wood, loose sheathing, or any other structural issues. Damaged areas should be repaired or replaced before installing the new metal roof. Rotted wood should be cut out and replaced with new, treated lumber. Loose sheathing can be secured with additional nails or screws. If significant damage is found, consult with a qualified roofing professional to assess the extent of the repairs needed. Proper repair ensures a solid base for the new metal roof, preventing future problems.
Comparison of Shingle Removal Techniques
Different techniques exist for removing asphalt shingles, each with its own advantages and disadvantages. The best method depends on factors such as the roof’s size, slope, and the condition of the shingles.
| Technique | Pros | Cons | Suitability |
|---|---|---|---|
| Manual Removal (Pry Bar) | Cost-effective, good control | Labor-intensive, time-consuming, physically demanding | Small roofs, relatively flat roofs |
| Power Removal (Shingle Eater) | Fast, efficient, less physically demanding | Higher initial cost, potential for damage if not used properly | Large roofs, steeper roofs |
| Combination Approach | Balances speed and control, minimizes damage | Requires skill and experience to use effectively | Most roof types, allowing flexibility in approach |
Roof Deck Preparation
A properly prepared roof deck is crucial for a long-lasting and secure metal roof installation. This involves a thorough inspection, necessary repairs, and a clean, even surface ready for the underlayment. Neglecting this step can lead to problems ranging from premature metal roof failure to compromised structural integrity.
Roof deck preparation begins with a comprehensive inspection of the existing sheathing. This process aims to identify and address any issues that could negatively impact the longevity and performance of the new metal roof.
Roof Deck Inspection and Repair
Inspecting the roof deck involves a careful examination of the plywood or OSB sheathing for signs of damage. This includes looking for rot, water damage, loose or broken boards, and any significant unevenness. Areas of rot should be cut out and replaced with new, appropriately sized pieces of sheathing. Loose or damaged boards need to be secured or replaced, ensuring a solid and level surface. For unevenness, shimming might be necessary to create a consistently flat plane for the new metal roofing. Remember to use appropriate fasteners for the type of sheathing and ensure they are long enough to penetrate sufficiently. For example, if you are dealing with a particularly damaged area, consider using a larger piece of replacement sheathing that overlaps the surrounding undamaged sections to improve stability.
Cleaning the Roof Deck
Thorough cleaning of the roof deck is essential before installing the underlayment. This removes any debris, dust, loose particles, or remnants of the old asphalt shingles that could compromise the adhesion of the underlayment. A stiff broom is usually sufficient, but for stubborn debris, a pressure washer (used cautiously to avoid damage) can be helpful. Ensure the deck is completely dry before proceeding to the next step. Failure to adequately clean the roof deck could lead to issues with the underlayment’s bond and, subsequently, the performance of the new roof.
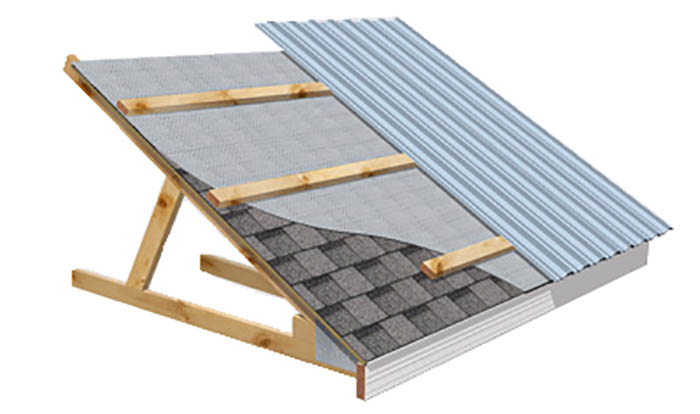
Underlayment Installation
Once the roof deck is clean, dry, and repaired, it’s time to install the underlayment. Underlayment, often felt paper or synthetic roofing underlayment, provides an additional layer of protection against moisture and acts as a secondary water barrier. Begin at the bottom edge of the roof and work your way up, overlapping each sheet according to the manufacturer’s instructions (typically 4-6 inches). Secure the underlayment with appropriate roofing staples or nails, ensuring even coverage and proper overlapping to prevent gaps. This additional layer protects against water penetration should the metal roofing system ever experience a leak, buying time for repairs. For example, using synthetic underlayment can provide superior water resistance and durability compared to traditional felt paper.
Metal Roof Installation
Installing a metal roof involves several crucial steps to ensure longevity and weather resistance. Proper panel selection, alignment, and fastening are paramount for a successful installation. This section details the process, focusing on panel types, installation techniques, and critical flashing details.
Metal Roofing Panel Types and Installation
Metal roofing panels come in various profiles and materials, each with its own installation nuances. Standing seam panels, for example, are known for their clean lines and excellent water shedding capabilities. They typically interlock, creating a virtually seamless roof surface. Installation involves securing the panels to purlins or directly to the roof deck using hidden fasteners, ensuring a weathertight seal. Ribbed panels, another popular choice, offer a more traditional look and are often less expensive. Their installation generally involves overlapping panels and securing them with exposed fasteners, requiring careful attention to spacing and alignment to maintain water resistance. Corrugated panels, known for their durability and affordability, are installed similarly to ribbed panels. The specific installation instructions will vary depending on the manufacturer and panel type; always consult the manufacturer’s specifications for detailed guidance.
Panel Alignment and Overlap
Precise panel alignment and proper overlap are essential for preventing leaks and ensuring a visually appealing finished product. Starting at the lowest point of the roof, align the first panel along a straight line, ensuring it is level and plumb. Subsequent panels should be carefully aligned with the previous panel, maintaining consistent overlap. The manufacturer’s recommended overlap should be strictly adhered to; insufficient overlap can compromise the roof’s weather resistance, while excessive overlap can lead to buckling or unevenness. Regularly check alignment using a level and straight edge throughout the installation process.
Fastening Methods
The fastening method depends heavily on the type of metal roofing panel used. Standing seam panels typically use hidden fasteners, securing the panels to the purlins or roof deck without exposing the fasteners. This enhances the aesthetic appeal and prevents corrosion. Ribbed and corrugated panels, on the other hand, often use exposed fasteners, requiring careful consideration of fastener type and spacing to ensure a secure and weathertight installation. Stainless steel fasteners are generally preferred for their corrosion resistance. The manufacturer’s instructions will specify the appropriate fastener type, spacing, and installation techniques. Using the wrong fasteners or improper spacing can lead to leaks or panel failure.
Flashing Around Chimneys and Vents
Proper flashing is crucial for preventing water penetration around chimneys, vents, and other roof penetrations. Flashing should be installed in a layered approach, creating a watertight seal between the roof surface and the penetration.
The basic principle involves creating a series of overlapping layers of flashing material, typically metal, that direct water away from the penetration. The first layer, the base flashing, is installed under the roofing material and extends up the sides of the penetration. The second layer, the counter flashing, is installed over the roofing material and extends down the sides of the penetration, overlapping the base flashing. A cap flashing is then installed over the counter flashing to provide an additional layer of protection. All seams should be sealed with a high-quality sealant to ensure a watertight seal. The specific details of flashing installation can vary depending on the type of penetration and the roofing material, so consulting a professional roofing installer or the manufacturer’s instructions is strongly advised.
Flashing and Sealants
Proper flashing and sealant application are critical for a long-lasting, leak-free metal roof. These components act as the primary defense against water intrusion, protecting your home from costly damage. Neglecting this stage can lead to significant problems down the line, rendering the entire roof installation process ineffective.
Proper flashing installation around chimneys, vents, and valleys prevents water from seeping underneath the metal roofing panels and into the underlying structure. Sealants further enhance this protection by filling gaps and creating a waterproof barrier. The choice of flashing material and sealant depends on factors such as the specific application, climate, and building codes.
Flashing Materials and Applications
Various flashing materials offer different levels of durability and suitability for various applications. The selection process requires careful consideration of the specific needs of the project. Common materials include galvanized steel, aluminum, copper, and rubberized asphalt. Galvanized steel is a cost-effective option for many applications, offering good durability. Aluminum is lightweight and corrosion-resistant, making it suitable for areas prone to moisture. Copper provides exceptional longevity and aesthetic appeal but comes at a higher cost. Rubberized asphalt is often used for underlayment and flashing in less visible areas. The choice often depends on budget and aesthetic preferences, as well as the expected lifespan of the roof.
Step-by-Step Flashing Installation
Before beginning any flashing installation, ensure the underlying roof deck is properly prepared and any necessary repairs have been completed. This includes addressing any damaged wood or areas where water could potentially penetrate. The following steps outline a typical flashing installation process around a chimney:
- Measure and Cut: Accurately measure the chimney’s dimensions to cut the flashing material to the appropriate size, ensuring adequate overlap for a watertight seal.
- Install Base Flashing: Secure the base flashing, typically a continuous sheet of metal, to the chimney’s base, ensuring a tight fit against the roof deck. Use appropriate fasteners, ensuring they are correctly spaced to prevent damage to the flashing.
- Install Step Flashing: Install step flashing, which consists of individual pieces of metal that overlap each other and the base flashing, to create a watertight seal around the chimney’s sides. Each piece should be carefully positioned and secured to create a continuous, overlapping seal. Overlap should be at least 2 inches.
- Install Cap Flashing: The cap flashing covers the top of the step flashing and provides an additional layer of protection. It should extend beyond the chimney to overlap the roof covering.
- Seal Joints: Apply a high-quality sealant to all joints and seams to further enhance water resistance. Ensure complete coverage of all exposed edges and seams.
Sealant Selection and Application
Sealants play a vital role in preventing leaks by filling gaps and creating a waterproof barrier between flashing and other roofing components. Different sealants offer varying levels of flexibility, durability, and resistance to UV degradation. Common types include silicone, butyl rubber, and polyurethane. Silicone sealants are known for their excellent weather resistance and flexibility, while butyl rubber sealants offer superior adhesion and durability. Polyurethane sealants provide good flexibility and fast curing times. The specific sealant chosen should be compatible with the flashing material and the environmental conditions. Proper application involves ensuring the surfaces are clean, dry, and free from debris before applying a continuous bead of sealant. Allow the sealant to cure completely before installing the next layer.
Finishing Touches and Cleanup
With the metal roof installation complete, the final stages focus on ensuring a durable, leak-free roof and a clean worksite. This involves a thorough inspection, site cleanup, and understanding how to maintain your new roof for years to come. Proper attention to these details will significantly impact the longevity and performance of your investment.
The final inspection is crucial for identifying any potential issues before they become major problems. It’s the last line of defense against leaks and future repairs. A systematic approach, including checking all seams, flashings, and fasteners, is essential.
Final Roof Inspection
A comprehensive final inspection involves several key steps. First, a visual inspection of the entire roof surface is conducted to check for any loose or missing fasteners, damaged panels, or improperly sealed seams. Next, a close examination of all flashings around chimneys, vents, and valleys is performed to ensure proper sealing and watertightness. Finally, a careful check of the gutters and downspouts verifies proper drainage to prevent water buildup. Any defects discovered during this inspection should be addressed immediately. A thorough inspection often involves using specialized tools, such as a moisture meter, to detect any hidden leaks.
Worksite Cleanup
Cleaning up the worksite after a metal roof installation is vital for safety and aesthetics. This includes removing all debris, such as old shingles, nails, and scrap metal, from the roof and surrounding areas. Proper disposal of these materials according to local regulations is essential. Any leftover materials, such as extra panels or fasteners, should be stored appropriately. The surrounding landscaping should be inspected and any damaged areas repaired. A pressure washer can be used to remove any remaining debris or dirt from the roof and surrounding surfaces. The goal is to leave the site cleaner than it was found.
Metal Roof Maintenance
Maintaining a metal roof is relatively straightforward, but regular inspections and occasional cleaning are crucial for its longevity. Annual inspections should be conducted to check for any signs of damage, such as loose fasteners, rust, or dents. Regularly cleaning the roof with a soft brush and water will remove dirt, leaves, and other debris that can accumulate. Avoid using harsh chemicals or abrasive cleaners, as these can damage the roof’s finish. If any issues are discovered during the inspection, they should be addressed promptly to prevent further damage. For example, loose fasteners should be tightened, and damaged panels should be replaced.
Potential Post-Installation Issues and Solutions
Several issues can arise after a metal roof installation, but many are easily addressed. A common problem is leaking around flashings. This can usually be solved by resealing the flashing with a high-quality sealant. Another potential issue is loose or missing fasteners. These should be tightened or replaced immediately. Rust is another potential concern, especially in areas with high humidity. Regular inspection and prompt attention to rust spots can prevent extensive damage. Finally, dents or scratches can occur during installation or from falling debris. Minor dents can often be repaired using specialized tools, while more significant damage may require panel replacement. Regular maintenance and prompt attention to any problems will help ensure the long-term performance of your metal roof.
Final Summary
Transforming your home with a durable metal roof over existing asphalt shingles is a rewarding project that significantly enhances your home’s curb appeal and protection. By following the steps outlined in this guide, focusing on careful preparation, and prioritizing safety, you can confidently achieve a successful installation. Remember, meticulous attention to detail, especially in flashing and sealant application, is crucial for preventing future leaks. With proper planning and execution, your new metal roof will provide years of reliable performance, adding value and peace of mind to your home.