Cost to put solar on house: Understanding the true cost of residential solar power involves far more than just the panels themselves. This exploration delves into the multifaceted factors influencing the total expense, from initial system design and equipment costs to the often-overlooked aspects of permits, labor, and long-term maintenance. We’ll navigate the complexities of financing options, available incentives, and the crucial process of selecting a reputable installer to ensure a smooth and cost-effective transition to solar energy.
This guide provides a comprehensive overview of the financial considerations, highlighting the various components that contribute to the overall cost, exploring different financing options to make solar more accessible, and outlining the steps involved in the installation process. We will also discuss ways to maximize savings and minimize long-term expenses, ultimately empowering you to make an informed decision about embracing solar energy for your home.
Factors Influencing Solar Panel Installation Costs
The total cost of installing a residential solar panel system is influenced by a complex interplay of factors. Understanding these components is crucial for homeowners to accurately budget and make informed decisions. This section details the key cost drivers, enabling a more precise estimation of your solar investment.
Component Costs
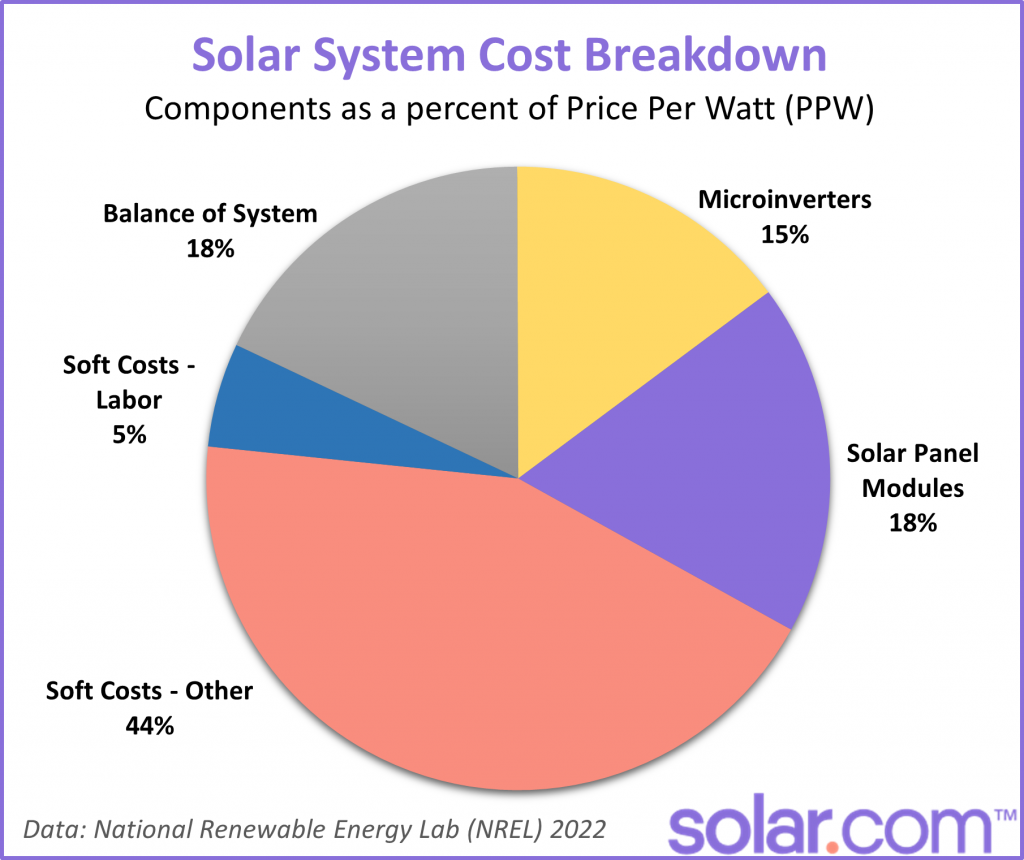
Several key components contribute significantly to the overall expense of a solar panel installation. These include the cost of the solar panels themselves, the inverters that convert DC power to AC power for your home, racking and mounting hardware, electrical work (wiring and connection to your home’s electrical system), and finally, the labor costs associated with installation. Permits and inspections, necessary for compliance with local regulations, also add to the overall price. The specific cost of each component can vary widely depending on factors such as the quality of materials, the complexity of the installation, and regional market conditions. For instance, high-efficiency panels generally command a higher price tag than standard panels, while a complex roof design may increase labor costs.
Solar Panel Type Variations
Different types of solar panels – monocrystalline, polycrystalline, and thin-film – exhibit varying levels of efficiency and cost. Monocrystalline panels, known for their high efficiency and sleek black appearance, typically represent the most expensive option. Polycrystalline panels, featuring a slightly lower efficiency and a characteristic blue appearance, generally offer a more affordable alternative. Thin-film panels, while the least efficient, often present the most budget-friendly choice. However, it’s important to note that the lower initial cost of thin-film panels may not always translate to long-term savings due to their lower energy output over their lifespan. The choice of panel type involves balancing initial cost with long-term energy production and overall return on investment.
System Size and Cost
The size of your solar panel system, measured in kilowatts (kW), directly impacts the total cost. A larger system, capable of generating more electricity, will naturally be more expensive. This increased cost reflects the higher number of panels, inverters, and associated materials required. However, a larger system also typically results in greater energy production, potentially offsetting the higher upfront investment over time. The following table illustrates the cost variations across different system sizes, providing an estimate of cost per kilowatt-hour (kWh) produced. These are average estimates and actual costs can vary depending on location and other factors.
| System Size (kW) | Estimated Cost | Average Energy Production (kWh/year) | Cost per kWh |
|---|---|---|---|
| 5 kW | $15,000 – $25,000 | 6,000 – 8,000 | $1.88 – $4.17 |
| 7 kW | $21,000 – $35,000 | 8,400 – 11,200 | $1.88 – $4.17 |
| 10 kW | $30,000 – $50,000 | 12,000 – 16,000 | $1.88 – $4.17 |
| 15 kW | $45,000 – $75,000 | 18,000 – 24,000 | $1.88 – $4.17 |
Geographical Location Impact
Geographical location significantly influences the overall cost of solar panel installation. Labor rates vary considerably across different regions, with higher costs typically found in densely populated areas with a higher demand for skilled labor. Permitting fees and inspection costs also differ depending on local regulations and administrative procedures. Furthermore, transportation costs for materials can be substantial, especially in remote locations. For example, installing a solar system in a rural area with limited access may incur higher transportation costs compared to an urban setting with easy access to suppliers. Additionally, prevailing weather conditions can impact installation time and therefore labor costs. Harsh weather might require additional safety measures and extend the project timeline.
Incentives and Financing Options
Going solar can be a significant investment, but various incentives and financing options are available to make it more affordable. Understanding these options is crucial for making an informed decision about whether and how to install solar panels on your home. This section details the financial assistance and payment plans available to help you navigate the process.
Federal, State, and Local Incentives
Several government programs offer financial support for residential solar installations. The most significant is the federal Investment Tax Credit (ITC), which provides a tax credit equal to a percentage of the total cost of your solar energy system. This credit can substantially reduce your tax liability, effectively lowering the upfront cost of your investment. The exact percentage varies over time, so it’s essential to check the current IRS guidelines. Beyond the federal ITC, many states and localities offer additional incentives such as rebates, tax exemptions, or property tax assessments. These incentives often vary significantly based on your location, the size of your system, and your household income. For example, some states might offer a direct rebate on the cost of the solar panels themselves, while others may provide tax credits specifically for renewable energy investments. It’s recommended to research the incentives available in your specific area through your state’s energy agency or local government websites.
Financing Methods: Loans, Leases, and Power Purchase Agreements (PPAs)
There are several ways to finance your solar panel installation, each with its own advantages and disadvantages. Choosing the right method depends on your financial situation, risk tolerance, and long-term goals.
Loans provide a straightforward approach, allowing you to borrow money to pay for the system upfront and repay the loan over a set period with interest. Leases involve paying a monthly fee to the solar company for the use of the system; you don’t own the panels but benefit from the energy they produce. Finally, Power Purchase Agreements (PPAs) are similar to leases, but you don’t pay a monthly fee; instead, you pay a fixed rate per kilowatt-hour (kWh) of electricity generated.
| Financing Type | Down Payment | Monthly Payment Example | Total Cost Over Loan Term |
|---|---|---|---|
| Loan | Variable (often 0-20%) | $150 – $500 (depending on loan amount and interest rate) | Loan amount + interest |
| Lease | $0 | $80 – $200 (depending on system size and lease terms) | Total monthly payments over lease term |
| Power Purchase Agreement (PPA) | $0 | Variable, based on kWh consumption | Total kWh payments over agreement term |
Installation Process and Timeline
Getting solar panels installed on your home is a multi-stage process that typically takes several weeks or even months to complete, depending on factors such as permit acquisition, weather conditions, and the complexity of the installation. Understanding this process and the potential timelines involved can help you manage expectations and ensure a smooth transition to solar energy.
The installation process itself is a series of carefully coordinated steps, requiring expertise in electrical work, roofing, and structural engineering. Each stage contributes to the overall success of the project, from initial site assessment to the final connection to the grid.
Site Assessment and System Design
This initial phase involves a thorough evaluation of your property to determine the suitability for solar panel installation. A qualified installer will assess your roof’s orientation, shading, structural integrity, and energy consumption patterns to design a customized solar system. This includes calculating the optimal number and placement of solar panels to maximize energy production. The process typically takes 1-2 weeks, including the creation of a detailed proposal outlining the system’s components, cost breakdown, and projected energy savings.
Permitting and Approvals
Once the system design is finalized, the installer will submit the necessary paperwork to obtain the required permits from your local authorities. This stage can be time-consuming, varying from a few weeks to several months depending on the jurisdiction’s regulations and processing times. Delays can occur due to incomplete applications, bureaucratic hurdles, or unexpected code requirements. Proactive communication with the installer and local authorities can help minimize delays. For example, a homeowner in California might experience a shorter permitting process than one in a rural area with less streamlined regulations.
Equipment Procurement and Delivery
After obtaining permits, the installer orders the necessary equipment, including solar panels, inverters, mounting hardware, and other components. Lead times for equipment can vary depending on manufacturer availability and supply chain dynamics. Delays in this phase can be mitigated by selecting readily available equipment or working with installers who maintain robust inventory management. For instance, a project initiated during peak demand periods might experience longer lead times than one initiated during off-peak seasons.
Installation and System Integration
This is the most labor-intensive phase, involving the physical installation of the solar panels, mounting hardware, inverters, and wiring. Experienced installers typically complete this within 1-3 days depending on the system size and roof complexity. Potential challenges include unexpected roof conditions (e.g., deteriorated roofing materials requiring repairs), unfavorable weather conditions (e.g., strong winds, heavy rain), or unforeseen structural issues. Mitigation strategies include thorough pre-installation inspections and contingency planning for weather delays.
System Testing and Commissioning
Once the installation is complete, a rigorous testing phase ensures the system operates safely and efficiently. This involves checking all electrical connections, performing performance tests, and verifying compliance with safety standards. Any issues identified during testing are addressed promptly before final connection to the grid. This typically takes 1-2 days. Delays can arise from unexpected system malfunctions requiring troubleshooting and repair. A well-maintained quality control process by the installer helps minimize these issues.
Final Connection and Inspection
The final step involves connecting the solar system to your home’s electrical grid. A final inspection by the utility company or a qualified inspector verifies the system’s compliance with all applicable regulations. This typically takes 1-2 weeks, depending on the utility company’s scheduling and inspection turnaround time. Delays can occur due to scheduling conflicts or issues identified during the final inspection. Effective communication with the utility company and prompt resolution of any identified issues are crucial.
Long-Term Costs and Savings
Going solar is a significant investment, but understanding the long-term costs and savings is crucial for making an informed decision. While the initial outlay can be substantial, the ongoing expenses are relatively low, and the potential for significant energy bill reductions and a positive return on investment over time is substantial. This section details the ongoing maintenance needs and explores how to estimate your potential savings and ROI.
Long-Term Maintenance Costs
Solar panel systems require minimal maintenance, but some upkeep is necessary to ensure optimal performance and longevity. Regular cleaning is essential to remove dirt, debris, and bird droppings that can reduce efficiency. This can often be done with a garden hose, although professional cleaning might be necessary once or twice a year, depending on your location and climate. The cost of this ranges from a few hundred dollars annually for a large system to minimal expense if you handle cleaning yourself. Occasional repairs might also be needed, such as replacing damaged panels or fixing faulty inverters. These repairs are typically covered under warranties for the first several years and are generally infrequent, but budgeting for unexpected repairs is prudent. Manufacturers typically offer warranties ranging from 10 to 25 years on panels and inverters, offering a degree of protection against costly repairs during that period.
Calculating Potential Energy Savings and Return on Investment (ROI)
Estimating your potential savings and ROI requires considering several factors. First, you need to assess your current annual energy consumption. Your electricity bill provides this information. Next, determine the system’s expected annual energy production, which is usually provided by your solar installer based on your roof’s orientation, shading, and local solar irradiance. Subtract the energy produced by your solar panels from your total energy consumption to determine the remaining energy you’ll need to purchase from the utility company. Multiply this remaining energy consumption by your current electricity rate to calculate your projected annual electricity bill after installing solar. The difference between your current annual electricity bill and your projected annual bill after solar installation represents your annual savings.
To calculate ROI, divide the total cost of your solar panel system (including installation and any applicable incentives) by your annual savings. The resulting number is the number of years it will take to recoup your investment. For example, if your system costs $20,000 and your annual savings are $2,000, your ROI is 10 years. Remember that this calculation doesn’t account for potential increases in electricity rates, which will further improve your ROI. Also, some incentives, like tax credits, can significantly reduce your initial investment cost, leading to a faster ROI.
Projected Energy Bill Reduction Over 10 Years
Let’s imagine a household with an average annual electricity bill of $2,400. They install a solar panel system costing $20,000 after factoring in incentives. The system is projected to produce 80% of their annual energy needs. Assuming a consistent electricity rate, the following table illustrates their projected energy bill reduction over 10 years:
| Year | Annual Energy Consumption (kWh) (Estimated – remains consistent for simplicity) | Solar Energy Production (kWh) (Estimated – remains consistent for simplicity) | Remaining Energy Purchased (kWh) | Electricity Rate ($/kWh) (Estimated – remains consistent for simplicity) | Annual Electricity Bill ($) | Annual Savings ($) |
|---|---|---|---|---|---|---|
| 1 | 12000 | 9600 | 2400 | 0.20 | 480 | 1920 |
| 2 | 12000 | 9600 | 2400 | 0.20 | 480 | 1920 |
| 3 | 12000 | 9600 | 2400 | 0.20 | 480 | 1920 |
| 4 | 12000 | 9600 | 2400 | 0.20 | 480 | 1920 |
| 5 | 12000 | 9600 | 2400 | 0.20 | 480 | 1920 |
| 6 | 12000 | 9600 | 2400 | 0.20 | 480 | 1920 |
| 7 | 12000 | 9600 | 2400 | 0.20 | 480 | 1920 |
| 8 | 12000 | 9600 | 2400 | 0.20 | 480 | 1920 |
| 9 | 12000 | 9600 | 2400 | 0.20 | 480 | 1920 |
| 10 | 12000 | 9600 | 2400 | 0.20 | 480 | 1920 |
Note: This is a simplified example. Actual savings will vary depending on energy consumption, electricity rates, solar panel system size and efficiency, and other factors. Fluctuations in electricity prices will also impact the actual savings realized. This example assumes consistent energy consumption, solar production, and electricity rates for simplicity. Real-world scenarios will be more complex.
Choosing a Reputable Installer
Selecting the right solar panel installer is crucial for a successful and cost-effective solar energy system. A reputable installer ensures a smooth installation process, optimal system performance, and access to necessary warranties and support. Failing to thoroughly vet potential installers can lead to significant financial and operational headaches down the line.
Choosing a reputable solar installer involves careful consideration of several key factors. This process minimizes risks and maximizes the return on your investment in solar power. Taking the time to properly research and compare installers will ultimately save you time, money, and frustration.
Installer Experience and Reputation
A prospective installer’s track record is paramount. Look for companies with extensive experience in residential solar installations, demonstrable expertise in your region’s specific climate and energy regulations, and a positive reputation amongst past clients. Check online reviews on platforms like Yelp and Google Reviews, and look for consistent positive feedback regarding professionalism, communication, and the quality of their work. Inquire about the number of years the company has been in business and the total number of installations they have completed. A longer history and a higher volume of successful projects often indicate greater experience and reliability.
Certifications and Licensing
Verify that the installer holds all necessary certifications and licenses to operate legally in your area. These certifications validate their competence and adherence to industry best practices. Look for certifications from reputable organizations such as the NABCEP (North American Board of Certified Energy Practitioners) for individual installers and relevant state-level licensing for the company itself. This ensures that the installer is qualified to design, install, and maintain your solar panel system safely and efficiently, complying with all local building codes and safety regulations. Contact your local authorities to verify licenses if necessary.
Warranties and Guarantees
Comprehensive warranties are a critical component of a reliable solar installation. A reputable installer will offer robust warranties covering both the equipment (solar panels, inverters, etc.) and workmanship. Thoroughly review the warranty terms, paying close attention to the duration of coverage, what is included, and any limitations or exclusions. A typical warranty should cover defects in materials and workmanship for a significant period (e.g., 25 years for panels, 10 years for inverters). Also, inquire about performance guarantees that ensure the system meets its projected energy output. A strong warranty demonstrates the installer’s confidence in their work and provides valuable protection for your investment.
Evaluating Quotes and Contracts
When comparing quotes, avoid focusing solely on the lowest price. Consider the overall value proposition, including the quality of the equipment, the installer’s reputation, the warranty coverage, and the terms of the contract. Compare apples to apples; ensure all quotes include the same components and services. Scrutinize the contract carefully before signing, paying close attention to the payment schedule, project timeline, and any potential additional costs. Understand all the terms and conditions, and don’t hesitate to ask for clarification on anything you don’t understand. A well-written contract protects both parties involved and outlines the responsibilities and expectations clearly.
The Importance of Multiple Quotes
Obtaining multiple quotes from different reputable installers is essential for informed decision-making. This allows for a fair comparison of prices, equipment, warranties, and overall service offerings. By comparing multiple quotes, you can identify the best value for your investment and avoid potential overcharges or hidden costs. It also allows you to gauge the professionalism and responsiveness of different installers. The process of obtaining and comparing multiple quotes empowers you to make an educated and confident choice, ensuring you select the most suitable installer for your needs.
Final Conclusion
Transitioning to solar power represents a significant investment, but the long-term benefits, both financial and environmental, are undeniable. By carefully considering the factors outlined in this guide – from initial costs and available incentives to choosing the right installer and understanding long-term maintenance – homeowners can make a well-informed decision that aligns with their budget and energy needs. Ultimately, understanding the true cost to put solar on your house empowers you to harness the power of the sun responsibly and effectively.